
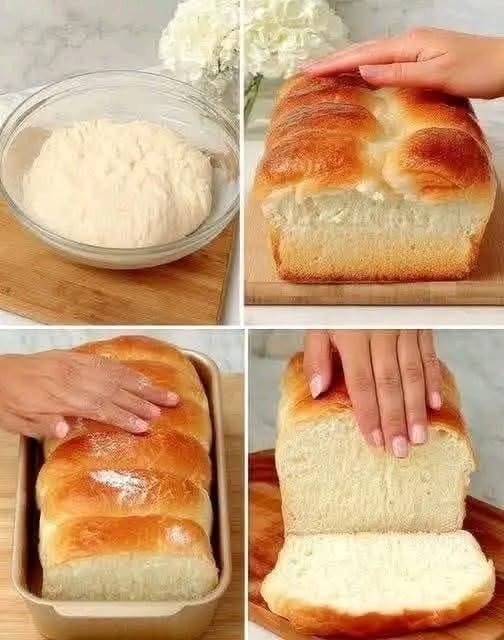
There’s something so satisfying about making a loaf of homemade sandwich bread from scratch. This Sourdough Sandwich Bread is soft, fluffy, slightly chewy, and perfect for everything from morning toast to hearty sandwiches.
Unlike rustic sourdough loaves with a thick, crunchy crust, this version has a soft crust and tender crumb that makes it ideal for everyday use. The sourdough starter gives it a gentle tang and wonderful flavor.
It’s one of those recipes that makes your kitchen smell incredible and gives you a beautiful homemade loaf without complicated techniques.
🌿 Introduction
This Sourdough Sandwich Bread is a great recipe for anyone who wants to enjoy the flavor of sourdough in a softer, more versatile loaf.
The dough is enriched with milk, butter, and a little honey, which help create a tender texture and lightly golden crust.
You can use active sourdough starter for the best rise and flavor, then let the dough ferment slowly until it becomes light and airy.
💛 Why You Will Love This Recipe
This bread is:
- 🍞 Soft and fluffy – Perfect for sandwiches and toast.
- 🌾 Full of sourdough flavor – A gentle tang without an overly sour taste.
- 🧈 Rich and tender – Butter and milk create a soft crumb.
- 🥪 Perfect for everyday meals – Great for breakfast, lunch, or snacks.
- 🏠 Homemade and fresh – Nothing beats freshly baked bread from your own kitchen.
Once you make your own loaf, store-bought sandwich bread may not taste quite the same!
🛒 Ingredients List
For this Sourdough Sandwich Bread, you’ll need:
- ½ cup (120 g) active sourdough starter
- ¾ cup (180 ml) warm milk
- ¼ cup (60 ml) warm water
- 3 cups (360 g) bread flour
- 2 tablespoons honey
- 1½ teaspoons salt
- 2 tablespoons unsalted butter, softened
Tip: Your sourdough starter should be active and bubbly before you begin. A recently fed starter that has risen well will give you a better rise.
👩🍳 Step-by-Step Instructions
1. Combine the Wet Ingredients
In a large mixing bowl, combine the active sourdough starter, warm milk, warm water, and honey.
Stir until the starter is mostly dissolved.
The liquid should feel comfortably warm, not hot.
2. Add the Flour
Add the bread flour and salt.
Mix with a wooden spoon or your hands until a rough dough forms and no large patches of dry flour remain.
Cover the bowl and let the dough rest for about 20–30 minutes.
3. Add the Butter
Add the softened butter to the dough.
Work it into the dough using your hands until the butter is fully incorporated and the dough becomes smoother.
It may feel sticky at first, but resist adding lots of extra flour.
4. Develop the Dough
Over the next 1–2 hours, perform a few gentle rounds of stretching and folding.
For each round, grab one side of the dough, gently stretch it upward, and fold it over itself.
Turn the bowl and repeat on the remaining sides.
Do this every 30 minutes for about 3–4 rounds.
The dough should gradually become smoother and more elastic.
5. Let the Dough Rise
Cover the bowl and leave the dough at room temperature until it becomes noticeably puffy and increases in volume.
Depending on the temperature of your kitchen and the strength of your starter, this can take approximately 4–8 hours.
Don’t rely only on the clock. Watch the dough for signs that fermentation is progressing.
6. Shape the Loaf
Lightly flour your work surface.
Gently transfer the dough onto it and shape it into a rectangle.
Roll the dough into a tight log, tucking the ends underneath.
Place the shaped dough seam-side down into a greased 9×5-inch loaf pan.
7. Final Proof
Cover the loaf pan and let the dough rise again.
This can take approximately 2–4 hours, depending on your room temperature and starter activity.
The dough should become visibly puffy and rise toward the top of the pan.
8. Bake
Preheat your oven to 375°F (190°C).
Bake the loaf for approximately 35–40 minutes, until the top is golden brown and the loaf sounds hollow when gently tapped.
If the top begins browning too quickly, loosely cover it with foil during the final part of baking.
9. Cool Completely
Remove the bread from the pan and place it on a wire rack.
Let it cool completely before slicing.
This is important because cutting into hot bread can make the inside seem gummy.
Once cooled, slice it into even pieces and enjoy!
✨ Pro Tips & Variations
- Use active starter: A strong, bubbly starter gives the loaf better lift.
- Don’t add too much flour: A slightly soft dough produces a more tender sandwich loaf.
- Watch fermentation: Warm kitchens can make the dough rise much faster.
- Use milk: It helps create a softer crumb and richer flavor.
- Add seeds: Sesame, sunflower, or flax seeds can add extra texture.
- Try whole wheat: Replace a small portion of the bread flour with whole wheat flour.
- For a softer crust: Brush the warm loaf lightly with butter after baking.
One mistake to avoid: Don’t slice the loaf immediately after removing it from the oven. Give it enough time to cool and set.
🥗 Simple Ingredient Benefits
This homemade bread uses simple ingredients that each contribute something important:
- Sourdough starter adds fermented flavor.
- Milk helps create a soft, tender crumb.
- Egg-free dough makes this recipe simple and versatile.
- Butter adds richness and softness.
- Bread flour provides the structure needed for a good sandwich loaf.
🍽️ Serving Suggestions
This Sourdough Sandwich Bread is delicious with:
- 🥑 Avocado and eggs
- 🧀 Cheese and vegetables
- 🥪 Turkey or chicken sandwiches
- 🍓 Jam and butter
- 🥜 Peanut butter and banana
- 🍳 Scrambled eggs
- ☕ Toast with your morning tea or coffee
It’s also excellent for grilled cheese because the soft bread becomes beautifully golden and crisp when toasted.
❄️ Storage Tips
Once completely cooled, store the loaf in an airtight bread bag or container at room temperature for about 3–4 days.
For longer storage, slice the bread and freeze it in a freezer-safe bag for up to 2–3 months.
You can toast individual frozen slices whenever you need them, making homemade bread convenient for busy mornings.
❓ Frequently Asked Questions
Can I use sourdough discard?
This recipe works best with active sourdough starter because the starter is responsible for helping the bread rise. Discard can be used in some sandwich bread recipes, but it generally needs another leavening method.
Why is my sourdough sandwich bread dense?
A weak starter, under-fermentation, or insufficient final proof can result in a dense loaf. Make sure your starter is active and give the dough enough time to become visibly puffy.
Can I make this bread overnight?
Yes. You can use a longer, cooler fermentation schedule and refrigerate the shaped dough overnight for a convenient morning bake.
Can I use all-purpose flour?
Yes. Bread flour generally gives a slightly chewier structure, but all-purpose flour can work well too.
How can I make the crust softer?
Brush the warm loaf with a little butter after baking and allow it to cool under a clean kitchen towel. This helps keep the crust tender.
🌟 Conclusion
This Sourdough Sandwich Bread is soft, fluffy, flavorful, and perfect for everyday meals. With a gentle sourdough tang, buttery crumb, and tender crust, it gives you everything you want from a classic sandwich loaf while still having that wonderful homemade sourdough character.
Once you get comfortable with the timing and fermentation, this can easily become your go-to weekly bread recipe.
